
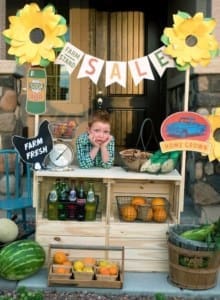
With the year winding down and the holidays quickly approaching, many dads are looking for one last activity that will solidify their position as Dad of the Year. Building something with the kids is a proven way to create lifelong memories. This homemade DIY farm stand is great activity to do with the kids to teach them about building their own furniture while also creating something they’ll love and cherish for years to come.
This DIY farm stand is easy to make and can be used to store fruits, veggies and even toys if your kids prefer! You’ll just need the following tools and supplies:
- 4 Knagglig crates from IKEA
- 4 wood sticks – 4 ft long, 2-inch wide
- 1 piece of wood – 36” x 12”
- ¼” width Bolts
- Electric drill
- Screwdriver
To get started, you’ll need to first assemble the Knagglig crate from IKEA. This is easy to assemble and will come with full instructions.
 To attach the crates, you will:
- Drill 2 holes in one short side of each crate
- Connect 2 bottom crates with bolts, washers and nuts.
- Connect 2 top crates in same manner.
- Drill 4 holes (2 in each crate) in long side of bottom set of crates. This will be the “top” of the bottom set that will attach to the “bottom” of the top set.
- Line up the drilled bottom set to the undrilled top set. Using a sharp pencil, mark inside your holes to the undrilled top crates so you can line up drill holes perfectly.
- Using pencil marks, drill holes in top set.
- Attach top set to bottom set with bolts, washers and nuts.
You will then attach the top:
- Drill a hole 1” in from edge, and at the halfway mark (6”) of each short side of the 12” x 36” wood.
- Set flush to the assembled crates, and mark through your drilled hole to the crates.
- Drill at marks and attach Top to crates with bolts, washers and nuts.
Then attach the sticks:
- On each of the four sticks, drill a centered hole 1” from top. You will use this to string your banners, flowers and decorations.
- On each of the four sticks, drill a centered hole 2” from bottom. Drill another hole 6” from bottom.
- Place a stick along the side-front edge, and mark through the holes with pencil. Drill into crate where your pencil marks are found.
- Place a stick along the side-back edge, and mark through the holes with pencil. We placed the back sticks slightly higher than the front so our back decorations would show up better, making a canopy effect. Drill into crate where your pencil marks are found.
Then the fun really begins…You decorate! Add flowers, streamers balloon, and anything else you and your kids think of!
For more fun things to build with your kids check out the Cadence website.


