
Learn to make online free animated videos and intros for business
The Powtoon plugin is an online tool to make animated video introductions. This tool allows you to create free and expert video explainers and message intros for your business as an alternative to PowerPoint. These animated videos with Powtoon will dress up any presentation or add some pizzazz to your website. Try Powton and other tricks to grab the attention of your customers or co-workers.
Accessing PowToon
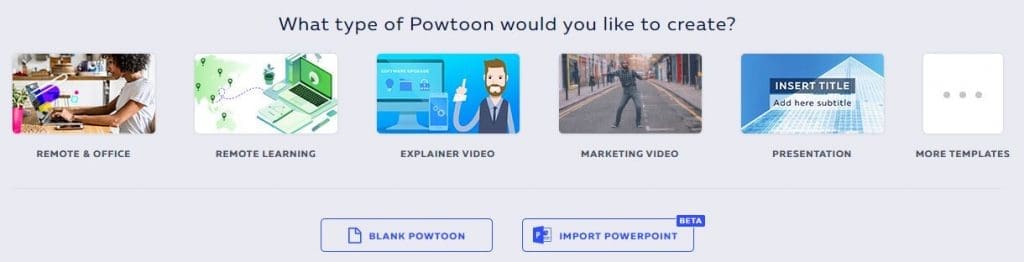
You can access Powtoon directly, or you can set up an account using your Google credentials. Once you have your account, you can choose to start your first animated videos with Powtoon using one of their templates, from scratch, or by uploading a PowerPoint presentation. They start from the tablet, which consists of arranged slides of videos made for presentations, slideshows, educational clips, and info-graphic videos. For ready-made presentations, select edit and get started creating from a blank template.
During the presentation of slides, switch around the film and the introduction modes based upon how you need to show or present your data. Introduction mode permits one to hold once focus for vivid introductions. This is an excellent tool that helps engage your audience via animated videos.
Library panel
The Powtoon library consists of various categories of texts, shapes, and characters that add to the presentation. You can also insert a custom image if you prefer, by selecting the image frame holder option.
The timeline
When creating your video, it helps to put your slides within a timeline. By doing this, you will be able to move the slide order around while creating your presentation. Once composed, click on play, and watch your newly created animation in action. The object duration bar within the timeline allows you to adjust the object’s timings on stage. The purpose of this enables you to enter and exit the scene with the help of object effects. Lastly, play controls will allow you to review and preview the presentation. The playback options necessitate it.
Panel slides
Panel slides contain the slides for the presentation. In the slide choice, you can include, copy all the items, and the timings. You likewise can fold the clones, which rehashes the past slides with the last casing. This helps in smooth progress from one slide to the next.
The transition between slides includes getting to the progress choices from the library panel. To add a cover to the progress, select the slide and snap on the ideal progress impact. The advancement will show up underneath your choice. To evacuate the progress, select the slide, and from the development, select the slide from the board alternative.
Layout for the slides incorporates activities, place holders, and essential timings. Access the slides design alternatives by tapping on the slide and choosing the format choice tab. A menu design will show up. Pick your favored plan. Alter the specific things on the slide and timings and modify the impacts. To apply another arrangement, select the format choices, and include another method.
Menu bar
The menu toolbar contains features that are basic to all presentations. This includes the save option, even though PowToon will autosave after every five minutes. A new tool facilitates the creation of a new PowToon project. The preview button allows you to share and review the link via the URL. The exporting tool helps to share and exportation of files directly.
Basic workflow steps
Step1: Storyboard Script
It is necessary to plan a presentation with a storyboard. It draws your ideas and narrations. And is the most the best way to outline your layout for animation.
Step 2. Record a voiceover/add sound
It is best to add your sounds first, followed by the animations. This will allow you to get the timing just right when combining your slides for animation. In the timeline which is present in the menu toolbar, select the sounds icon. You may add the sound or remove it to another music track, adjust it with the built-in controls, preview, and replay.
Step 3: Add slides.
Use slides and panels based on your presentation and add the objects. Drag item presentations from the PowToon panel library onto the slide, with both the characters and texts. You can decide how you want to lay them out. You can even lay them on top of one another and deliberately utilize the activity timings, making a feeling of dynamic development and animation connections. Use the left and right-click buttons to manage objects.
Step 4: Animate objects.
The animation occurs with the help of the duration bar present in the timeline. Select the object that you want to animate. Go ahead and choose the best style and effect that you wish for this purpose, both in the entry and the exit frames. With the help of sliders, alter the course of the object duration’s from the slides. Include and evacuate the overall timings required. They are each 20 seconds in length.
Step 5. Preview
Through the playback controls, you can survey the entire presentation. Throughout the whole performance, ensure that you keep saving your work to avoid losing any data.
Step 6: publish
To publish your PowToon, you may decide to share it via a link or embed it. Select preview from the dialogue panel. Then go ahead and choose from one of the sharing options indicated
Regardless of your ability level or the job that is needed, making visual correspondences with Powtoon will add significantly to your site.
Conclusion | Animated videos with Powtoon
With Powtoon, making your animated recordings requires no structure or tech aptitudes to begin having fun and impressing your audience. Improve internal communications and impress your colleagues with easy-to-make videos. Create videos to summarize meetings, kickoff projects, set goals & more with Powtoon.


